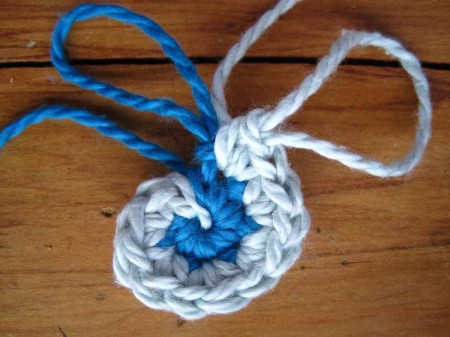
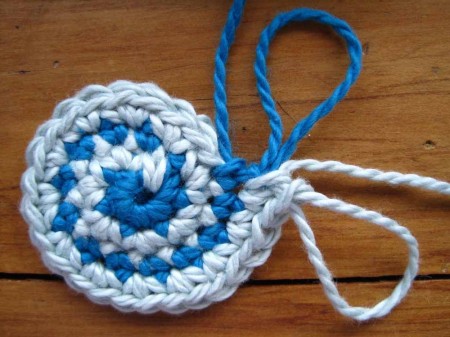
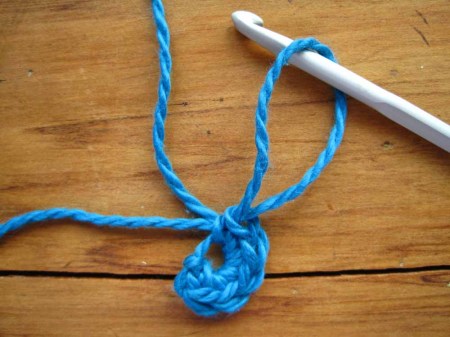
This hat is crocheted using two different colours as a twin spiral.
You will need two standard balls of Aran weight yarn. One dark grey, one yellow, I used Drops Alaska Dark Grey Mix and Rico Essentials Sun yellow along with a 4mm crochet hook, I like the knit pro Symfonie hooks, other hooks are available.
Most of my pattern is blatantly stolen from the Moriaty hat on little house by the sea from whom I also nicked the pics (didn't seem a lot of point taking my own), but I have modified it as I find I get a hat that is too small otherwise.
When I crochet, I work the stitches pretty tight, I get an almost felted effect as I firmly snug the yarn up after each stitch.
Notes on sizing
I have an average size head and am pretty baldy, this hat fits snug with 120 stitches as the crown circumference.If you crochet loose you might want to drop the 2 double crochet increases in round 18 and just double crochet into each stitch. Alternatively if you have a big head with thick hair or want a loose hat you could repeat round 18's 2 double crochets on round 19, you would then have 130 stitches and a bigger hat.
Method
dc means double crochet
Shaping the crown
To start: with your dark grey yarn make an adjustable ring (this is just a slipknot) by making a loop with your yarn with the tail end of the yarn in front of the working yarn, insert your hook into the loop and draw the working yarn through, then chain 1.
Round 1: dc six times into the adjustable ring, then pull the yarn through so you have a big loop and remove the hook – remember to do this on every round so that you don’t accidentally unravel your stitches.
Round 2: Join contrasting yarn into the adjustable ring, pull the ring closed, then dc twice into each of the stitches in the previous round. (12 stitches)

Round 3: 1 dc into each stitch of previous round. (12 stitches)

Round 4: 2 dc into each stitch of previous round. (24 stitches)

Round 5: 1 dc into each stitch of previous round. (24 stitches)
Round 6: 2dc into first stitch, then 1 dc into next stitch. Repeat until end. (36 stitches)
Round 7: 1 dc into each stitch of previous round. (36 stitches)
Round 8: 2dc into first stitch, then 1 dc into next two stitches. Repeat until end. (48 stitches)
Round 9: 1 dc into each stitch of previous round. (48 stitches)
Round 10: – 2 dc into first stitch, then 1 dc into next three stitches. Repeat until end. (60 stitches)

Round 3: 1 dc into each stitch of previous round. (12 stitches)

Round 4: 2 dc into each stitch of previous round. (24 stitches)

Round 5: 1 dc into each stitch of previous round. (24 stitches)
Round 6: 2dc into first stitch, then 1 dc into next stitch. Repeat until end. (36 stitches)
Round 7: 1 dc into each stitch of previous round. (36 stitches)
Round 8: 2dc into first stitch, then 1 dc into next two stitches. Repeat until end. (48 stitches)
Round 9: 1 dc into each stitch of previous round. (48 stitches)
Round 10: – 2 dc into first stitch, then 1 dc into next three stitches. Repeat until end. (60 stitches)
Round 11: 1 dc into each stitch of previous round. (60 stitches)
Round 12: – 2 dc into first stitch, then 1 dc into next three stitches. Repeat until end. (75 stitches)
Round 13: 1 dc into each stitch of previous round. (75 stitches)
Round 14: 2 dc into first stitch, then 1 dc into next three stitches. Repeat until end. (93 stitches)
Round 15: 1 dc into each stitch of previous round. (93 stitches)
Round 16: 2 dc into first stitch, then 1 dc into next 4 stitches. Repeat until end. (111 stitches)
Round 17: 1 dc into each stitch of previous round. (111 stitches)
Round 18: dc into first stitch, then 1 dc into next 11 stitches. Repeat until end. (120 stitches)
Crown shaping is complete.
Main body of the hat
Continue to alternate your colours by dc into each stitch as before for 14 more rounds. It helps hide the transition to a single yarn if you chain 6 stitches as you switch to working a single colour yarn. You will see what I mean when you get there.
If you have enough yarn you can then work 8 rounds in black or yellow as you choose to make the final coloured band at the base of the hat. I ran out of dark grey so I did 5 rounds in Grey and then 3 in yellow.
Weave in all ends.
This hat fits half way down my ears and over the eyebrows, if you want longer do a few more rounds.
Finally dip in some warm water and plonk on head to dry and block it into shape.


0 comments:
Post a Comment